태깅 작업이란 각 단어가 어떤 유형에 속해있는지 알아내는 작업을 의미하며 대표적인 2가지 예시는 다음과 같다.
-개체명인식(NER, Named Entity Recognition): 사람, 장소, 단체 등 어떤 유형인지 알아내는 작업
-품사태깅(Part-of-Speech Tagging): 단어의 품사가 명사, 동사, 형용사인지를 알아내는 작업
이번 장에서는 RNN 다대다 구조를 이용해 개체명인식과 품사태깅을 실습해본다.
# 12-01 케라스를 이용한 태깅 작업 개요
-다대다 문제이므로 return_sequences=True를 설정해 출력층에 모든 은닉상태 값을 보냄
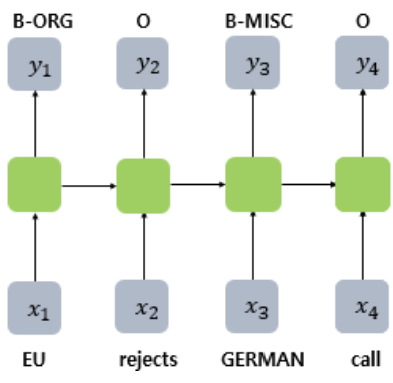
-양방향 RNN 사용
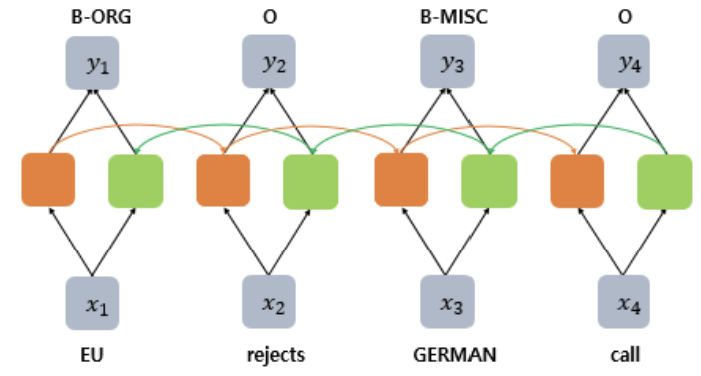
-지도 학습에 속하며, X와 y데이터는 쌍을 이루는 병렬 구조이다.
-시퀀스 레이블링: 입력시퀀스 X에 대하여 레이블 시퀀스 y를 각각 부여하는 작업(ex. 태깅작업)
# 12-02 BiLSTM을 이용한 품사태깅
1. 품사태깅 데이터 전처리
import nltk
import numpy as np
import matplotlib.pyplot as plt
from tensorflow.keras.preprocessing.text import Tokenizer
from tensorflow.keras.preprocessing.sequence import pad_sequences
from tensorflow.keras.utils import to_categorical
from sklearn.model_selection import train_test_split

# 토큰화 및 품사 태깅이 된 데이터 받아오기
tagged_sentences = nltk.corpus.treebank.tagged_sents()
print("품사 태깅이 된 문장 개수: ", len(tagged_sentences)) # 3914

# 단어는 단어끼리, 레이블은 레이블끼리 저장
sentences, pos_tags = [], []
for tagged_sentence in tagged_sentences:
    sentence, tag_info = zip(*tagged_sentence)
    sentences.append(list(sentence)) # 단어
    pos_tags.append(list(tag_info)) # 품사 레이블

# 분포 확인
print('샘플의 최대 길이 : %d' % max(len(l) for l in sentences)) # 271
print('샘플의 평균 길이 : %f' % (sum(map(len, sentences))/len(sentences))) # 25.722024
plt.hist([len(s) for s in sentences], bins=50)
plt.xlabel('length of samples')
plt.ylabel('number of samples')
plt.show()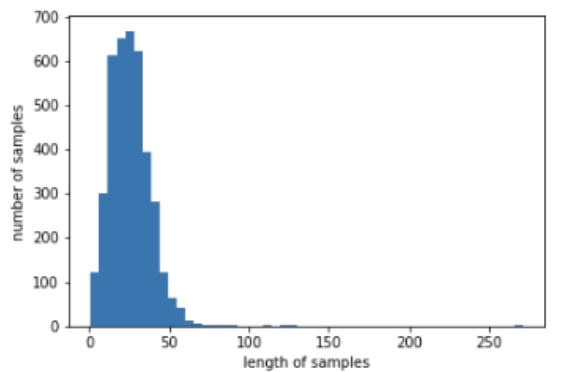
# 정수 인코딩 함수 정의
def tokenize(samples):
  tokenizer = Tokenizer()
  tokenizer.fit_on_texts(samples)
  return tokenizer

src_tokenizer = tokenize(sentences) # 단어
tar_tokenizer = tokenize(pos_tags) # 품사 레이블

vocab_size = len(src_tokenizer.word_index) + 1
tag_size = len(tar_tokenizer.word_index) + 1
print('단어 집합의 크기 : {}'.format(vocab_size)) # 11388
print('태깅 정보 집합의 크기 : {}'.format(tag_size)) # 47

# 정수 인코딩 수행
X_train = src_tokenizer.texts_to_sequences(sentences)
y_train = tar_tokenizer.texts_to_sequences(pos_tags)

# 최대 길이 150으로 패딩
max_len = 150
X_train = pad_sequences(X_train, padding='post', maxlen=max_len)
y_train = pad_sequences(y_train, padding='post', maxlen=max_len)

# train, test 데이터 분리
X_train, X_test, y_train, y_test = train_test_split(X_train, y_train, test_size=.2, random_state=777)
2. BiLSTM을 이용한 POS Tagger
from tensorflow.keras.models import Sequential
from tensorflow.keras.layers import Dense, LSTM, InputLayer, Bidirectional, TimeDistributed, Embedding
from tensorflow.keras.optimizers import Adam

embedding_dim = 128 # 임베딩벡터 차원
hidden_units = 128 # 은닉상태 차원

model = Sequential()
model.add(Embedding(vocab_size, embedding_dim, mask_zero=True))
model.add(Bidirectional(LSTM(hidden_units, return_sequences=True))) # 다대다 문제, 양방향 LSTM
model.add(TimeDistributed(Dense(tag_size, activation=('softmax'))))

# 레이블에 원핫인코딩을 하지 않고 학습할 경우 categorical_crossentropy 대신 sparse_categorical_crossentropy를
model.compile(loss='sparse_categorical_crossentropy', optimizer=Adam(0.001), metrics=['accuracy'])
model.fit(X_train, y_train, batch_size=128, epochs=7, validation_data=(X_test, y_test))
# 테스트 데이터에 대해 모델 평가
print("\n 테스트 정확도: %.4f" % (model.evaluate(X_test, y_test)[1])) # 0.9016# 실제로 맞추고 있는지 특정 테스트 샘플(10번 인덱스)로 확인
index_to_word = src_tokenizer.index_word # 단어 리턴
index_to_tag = tar_tokenizer.index_word # 품사 레이블 리턴
i = 10
y_predicted = model.predict(np.array([X_test[i]])) # 입력한 테스트용 샘플에 대해서 예측값 y를 리턴
y_predicted = np.argmax(y_predicted, axis=-1) # 확률 벡터를 정수 레이블로 변환
print("{:15}|{:5}|{}".format("단어", "실제값", "예측값"))
print(35 * "-")
for word, tag, pred in zip(X_test[i], y_test[i], y_predicted[0]):
if word != 0: # PAD값은 제외
print("{:17}: {:7} {}".format(index_to_word[word], index_to_tag[tag].upper(), index_to_tag[pred].upper()))단어 |실제값 |예측값
-----------------------------------
in : IN IN
addition : NN NN
, : , ,
buick : NNP NNP
is : VBZ VBZ
a : DT DT
relatively : RB RB
respected : VBN VBN
nameplate : NN NN
among : IN IN
american : NNP NNP
express : NNP NNP
card : NN NN
holders : NNS NNS
, : , ,
says : VBZ VBZ
0 : -NONE- -NONE-
*t*-1 : -NONE- -NONE-
an : DT DT
american : NNP NNP
express : NNP NNP
spokeswoman : NN NN
. : . .
# 12-03 NLTK를 이용한 개체명인식
-개체명인식(Named Entity Recognition)이란, 이름을 가진 개체(named entity)를 인식하는 작업
-NLTK는 개체명 인식기(NER chunker)를 제공한다
from nltk import word_tokenize, pos_tag, ne_chunk

# 샘플 문장
sentence = "James is working at Disney in London"

# 토큰화 후 품사 태깅
tokenized_sentence = pos_tag(word_tokenize(sentence))

# 개체명 인식
ner_sentence = ne_chunk(tokenized_sentence)
print(ner_sentence)
# 결과
(S
(PERSON James/NNP) # PERSON(사람)
is/VBZ
working/VBG
at/IN
(ORGANIZATION Disney/NNP) # ORGANIZATION(조직)
in/IN
(GPE London/NNP)) # GPE(위치)
# 12-04 개체명인식의 BIO 표현 이해하기
-개체명인식은 챗봇 등에서 필요한 중요한 전처리 작업으로, 도메인 목적에 맞게 데이터를 준비해 모델을 만들어야 함
1. BIO 표현이란?
-B(Begin: 개체명이 시작되는 부분), I(Inside: 개체명의 내부 부분), O(Outside: 개체명이 아닌 부분)
ex) 영화제목인 '해리포터'와 극장인 '메가박스'라는 개체명을 뽑아내고 싶다면?
해 B-movie
리 I-movie
포 I-movie
터 I-movie
보 O
러 O
메 B-theater
가 I-theater
박 I-theater
스 I-theater
가 O
자 O
2. 개체명인식 데이터 전처리
개체명인식을 위한 전통적인 영어 데이터셋인 CONLL2003 를 살펴보자.
# 데이터의 형식은 [단어] [품사 태깅] [청크 태깅] [개체명 태깅]
EU NNP B-NP B-ORG # EU는 개체명의 시작(B)이자 조직이므로 B-ORG
rejects VBZ B-VP O # 개체명이 아님(O)
German JJ B-NP B-MISC
call NN I-NP O
to TO B-VP O
boycott VB I-VP O
British JJ B-NP B-MISC
lamb NN I-NP O
. . O O

Peter NNP B-NP B-PER # 새로운 문장 시작
Blackburn NNP I-NP I-PER # 이어지는 개체명(I)이자 사람이므로 I-PER
이제 전처리를 수행한다.
import re
import numpy as np
import matplotlib.pyplot as plt
import urllib.request
from tensorflow.keras.preprocessing.text import Tokenizer
from tensorflow.keras.preprocessing.sequence import pad_sequences
from tensorflow.keras.utils import to_categorical
from sklearn.model_selection import train_test_split

urllib.request.urlretrieve("https://raw.githubusercontent.com/ukairia777/tensorflow-nlp-tutorial/main/12.%20RNN%20Sequence%20Labeling/dataset/train.txt", filename="train.txt")

f = open('train.txt', 'r')
tagged_sentences = []
sentence = []

for line in f:
    if len(line)==0 or line.startswith('-DOCSTART') or line[0]=="\n":
        if len(sentence) > 0:
            tagged_sentences.append(sentence)
            sentence = []
        continue
    splits = line.split(' ') # 공백을 기준으로 속성 구분
    splits[-1] = re.sub(r'\n', '', splits[-1]) # 줄바꿈 표시 제거
    word = splits[0].lower() # 소문자화
    sentence.append([word, splits[-1]]) # 단어와 개체명태깅만 기록
print("전체 샘플 개수: ", len(tagged_sentences)) # 14041# 단어는 단어끼리, 레이블은 레이블끼리 저장
sentences, ner_tags = [], []
for tagged_sentence in tagged_sentences:
sentence, tag_info = zip(*tagged_sentence)
sentences.append(list(sentence)) # 단어
ner_tags.append(list(tag_info)) # 개체명태깅 레이블
# 분포 확인
print('샘플의 최대 길이 : %d' % max(len(sentence) for sentence in sentences)) # 113
print('샘플의 평균 길이 : %f' % (sum(map(len, sentences))/len(sentences))) # 14.501887
plt.hist([len(sentence) for sentence in sentences], bins=50)
plt.xlabel('length of samples')
plt.ylabel('number of samples')
plt.show()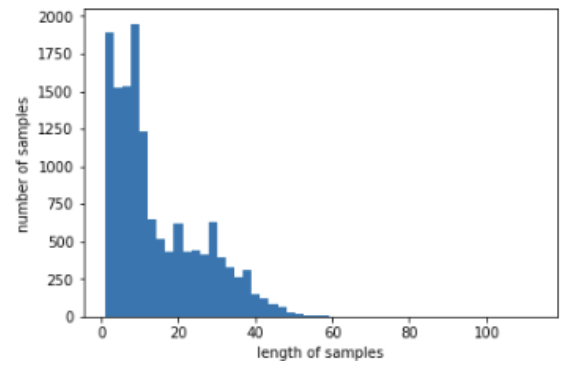
# 정수 인코딩 함수 정의
vocab_size = 4000 # 빈도수 상위 4000개 단어만 사용
src_tokenizer = Tokenizer(num_words=vocab_size, oov_token='OOV') # 단어
src_tokenizer.fit_on_texts(sentences)
tar_tokenizer = Tokenizer() # 개체명태깅 레이블
tar_tokenizer.fit_on_texts(ner_tags)

# 정수 인코딩 수행
X_train = src_tokenizer.texts_to_sequences(sentences)
y_train = tar_tokenizer.texts_to_sequences(ner_tags)

# 디코딩 문장 정의
index_to_word = src_tokenizer.index_word
index_to_ner = tar_tokenizer.index_word

# 첫번째 샘플에 대해 디코딩 수행
decoded = []
for index in X_train[0] : # 첫번째 샘플 안의 각 정수로 변환된 단어에 대해서
    decoded.append(index_to_word[index]) # 단어로 변환

print('기존 문장 : {}'.format(sentences[0]))
print('빈도수가 낮은 단어가 OOV 처리된 문장 : {}'.format(decoded))
# 결과
기존 문장 : ['eu', 'rejects', 'german', 'call', 'to', 'boycott', 'british', 'lamb', '.']
빈도수가 낮은 단어가 OOV 처리된 문장 : ['eu', 'OOV', 'german', 'call', 'to', 'boycott', 'british', 'OOV', '.']# 모든 샘플 길이 70으로 패딩
max_len = 70
X_train = pad_sequences(X_train, padding='post', maxlen=max_len)
y_train = pad_sequences(y_train, padding='post', maxlen=max_len)
# train, test 데이터 분리
X_train, X_test, y_train, y_test = train_test_split(X_train, y_train, test_size=.2, random_state=777)
# 레이블에 원핫인코딩
y_train = to_categorical(y_train, num_classes=tag_size)
y_test = to_categorical(y_test, num_classes=tag_size)
3. BiLSTM을 이용한 개체명인식
from tensorflow.keras.models import Sequential
from tensorflow.keras.layers import Dense, Embedding, LSTM, Bidirectional, TimeDistributed
from tensorflow.keras.optimizers import Adam

embedding_dim = 128 # 임베딩벡터 차원
hidden_units = 128 # 은닉상태 크기

model = Sequential()
# 패딩을 하느라 0이 많아진 경우 mask_zero=True를 설정해 숫자 0을 연산에서 제외시킬 수 있음
model.add(Embedding(input_dim=vocab_size, output_dim=embedding_dim, input_length=max_len, mask_zero=True))
# 다대다 문제이므로 return_sequences=True
model.add(Bidirectional(LSTM(hidden_units, return_sequences=True)))
# 다대다 구조에 모든 시점을 사용하려면 출력층에 TimeDistributed() 사용
model.add(TimeDistributed(Dense(tag_size, activation='softmax'))) # 다중클래스 분류
model.compile(loss='categorical_crossentropy', optimizer=Adam(0.001), metrics=['accuracy']) # 다중클래스 분류
model.fit(X_train, y_train, batch_size=128, epochs=8, validation_data=(X_test, y_test))
# 테스트 데이터에 대해 모델 평가
print("\n 테스트 정확도: %.4f" % (model.evaluate(X_test, y_test)[1])) # 0.9573# 실제로 맞추고 있는지 샘플(인덱스 10번)으로 확인
i = 10
y_predicted = model.predict(np.array([X_test[i]])) # 입력한 테스트용 샘플에 대해서 예측 y 리턴
y_predicted = np.argmax(y_predicted, axis=-1) # 확률벡터를 정수레이블로 변환(예측값)
labels = np.argmax(y_test[i], -1) # 원핫벡터를 정수인코딩으로 변환(실제값)
print("{:15}|{:5}|{}".format("단어", "실제값", "예측값"))
print(35 * "-")
for word, tag, pred in zip(X_test[i], labels, y_predicted[0]):
if word != 0: # PAD값은 제외함.
print("{:17}: {:7} {}".format(index_to_word[word], index_to_ner[tag].upper(), index_to_ner[pred].upper()))단어 |실제값 |예측값
-----------------------------------
sarah : B-PER B-PER
brady : I-PER I-PER
, : O O
whose : O O
republican : B-MISC B-MISC
husband : O O
was : O O
OOV : O O
OOV : O O
in : O O
an : O O
OOV : O O
attempt : O O
on : O O
president : O O
ronald : B-PER B-PER
reagan : I-PER I-PER
, : O O
took : O O
centre : O O
stage : O O
at : O O
the : O O
democratic : B-MISC B-MISC
national : I-MISC I-MISC
convention : I-MISC I-MISC
on : O O
monday : O O
night : O O
to : O O
OOV : O O
president : O O
bill : B-PER B-PER
clinton : I-PER I-PER
's : O O
gun : O O
control : O O
efforts : O O
. : O O출력 결과, 대부분 단어가 'O' (개체명이 아님)로 태깅되어 수많은 'O'로 accuracy가 결정되고 있어 적절하지 않다. 따라서 다음 실습에서는 F1-score를 도입한다.
# 12-05 BiLSTM을 이용한 개체명인식
이번 실습에서는 다른 데이터를 사용하고, 평가방식에는 F1-score를 사용해본다.
1. 개체명인식 데이터 전처리
다음 링크의 데이터를 사용한다: https://www.kaggle.com/abhinavwalia95/entity-annotated-corpus
# 데이터 불러오기
import pandas as pd
import numpy as np
import matplotlib.pyplot as plt
import urllib.request
from tensorflow.keras.preprocessing.text import Tokenizer
from tensorflow.keras.preprocessing.sequence import pad_sequences
from sklearn.model_selection import train_test_split
from tensorflow.keras.utils import to_categorical

urllib.request.urlretrieve("https://raw.githubusercontent.com/ukairia777/tensorflow-nlp-tutorial/main/12.%20Sequence%20Labeling/dataset/ner_dataset.csv", filename="ner_dataset.csv")
data = pd.read_csv("ner_dataset.csv", encoding="latin1")

# 어떤 열에 Null값이 있는지 출력
data.isnull().sum() # 'Sentences #'에만 1000616개

# 중복을 제거한 값 개수 출력
data['Sentence #'].nunique() # 47959

# 태깅 종류별 횟수 출력
print(data.groupby('Tag').size().reset_index(name='count'))

# 결측값을 바로 앞의 행 값으로 채움
data = data.fillna(method="ffill")

# 모든 단어 소문자화
data['Word'] = data['Word'].str.lower()

# 단어와 태깅 쌍으로 묶기
func = lambda temp: [(w, t) for w, t in zip(temp["Word"].values.tolist(), temp["Tag"].values.tolist())]
tagged_sentences=[t for t in data.groupby("Sentence #").apply(func)]

# 단어는 단어끼리, 태깅은 태깅끼리 묶기
sentences, ner_tags = [], []
for tagged_sentence in tagged_sentences:
    sentence, tag_info = zip(*tagged_sentence)
    sentences.append(list(sentence)) # 단어
    ner_tags.append(list(tag_info)) # 태깅

# 분포 확인
print('샘플의 최대 길이 : %d' % max(len(l) for l in sentences)) # 104
print('샘플의 평균 길이 : %f' % (sum(map(len, sentences))/len(sentences))) # 21.863987989741236
plt.hist([len(s) for s in sentences], bins=50)
plt.xlabel('length of samples')
plt.ylabel('number of samples')
plt.show()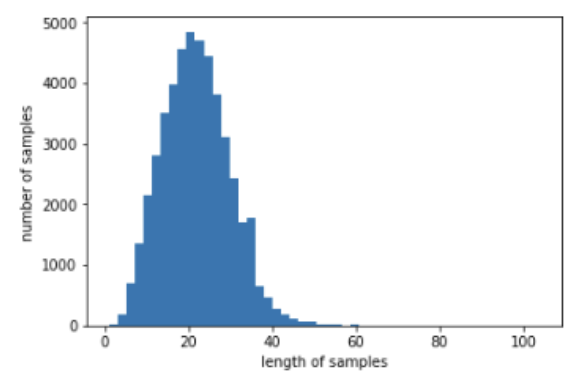
# 정수인코딩 함수 정의
# 모든 단어를 사용하며 인덱스 1에는 단어 'OOV'를 할당.
src_tokenizer = Tokenizer(oov_token='OOV')
# 태깅 정보들은 내부적으로 대문자를 유지한 채 저장
tar_tokenizer = Tokenizer(lower=False)

src_tokenizer.fit_on_texts(sentences)
tar_tokenizer.fit_on_texts(ner_tags)

# 이 때, src_tokenizer를 만들 때 Tokenizer의 인자로 oov_token='OOV'를 선택했으므로 인덱스1에 'OOV'
print('단어 OOV의 인덱스 : {}'.format(src_tokenizer.word_index['OOV']))

# 정수인코딩 수행
X_data = src_tokenizer.texts_to_sequences(sentences)
y_data = tar_tokenizer.texts_to_sequences(ner_tags)

# 디코딩 문장 정의
word_to_index = src_tokenizer.word_index
index_to_word = src_tokenizer.index_word
ner_to_index = tar_tokenizer.word_index
index_to_ner = tar_tokenizer.index_word
index_to_ner[0] = 'PAD'

# 첫번째 샘플에 대해 디코딩
decoded = []
for index in X_data[0] : # 첫번째 샘플 안의 인덱스들에 대해서
    decoded.append(index_to_word[index]) # 다시 단어로 변환
print('기존의 문장 : {}'.format(sentences[0]))
print('디코딩 문장 : {}'.format(decoded))
# 결과 생략

# 최대길이 70으로 패딩
max_len = 70
X_data = pad_sequences(X_data, padding='post', maxlen=max_len)
y_data = pad_sequences(y_data, padding='post', maxlen=max_len)

# train, test 데이터 분리
X_train, X_test, y_train_int, y_test_int = train_test_split(X_data, y_data, test_size=.2, random_state=777)

# 레이블에 원핫인코딩
y_train = to_categorical(y_train_int, num_classes=tag_size)
y_test = to_categorical(y_test_int, num_classes=tag_size)
2. BiLSTM을 이용한 개체명인식
from tensorflow.keras.models import Sequential
from tensorflow.keras.layers import Dense, LSTM, InputLayer, Bidirectional, TimeDistributed, Embedding
from tensorflow.keras.optimizers import Adam

embedding_dim = 128 # 임베딩벡터 차원
hidden_units = 256 # 은닉상태 크기

model = Sequential()
model.add(Embedding(vocab_size, embedding_dim, mask_zero=True))
model.add(Bidirectional(LSTM(hidden_units, return_sequences=True)))
model.add(TimeDistributed(Dense(tag_size, activation=('softmax'))))
model.compile(loss='categorical_crossentropy', optimizer=Adam(0.001), metrics=['accuracy'])

history = model.fit(X_train, y_train, batch_size=128, epochs=6, validation_split=0.1)
# 임의의 샘플(인덱스 13번)에 대해 모델 평가
i = 13
y_predicted = model.predict(np.array([X_test[i]])) # 입력한 테스트용 샘플에 대해서 예측 y를 리턴
y_predicted = np.argmax(y_predicted, axis=-1) # 확률 벡터를 정수 인코딩으로 변환(예측값)
labels = np.argmax(y_test[i], -1) # 원-핫 인코딩을 다시 정수 인코딩으로 변환(실제값)
print("{:15}|{:5}|{}".format("단어", "실제값", "예측값"))
print(35 * "-")
for word, tag, pred in zip(X_test[i], labels, y_predicted[0]):
if word != 0: # PAD값은 제외함.
print("{:17}: {:7} {}".format(index_to_word[word], index_to_ner[tag], index_to_ner[pred]))# 결과
단어 |실제값 |예측값
-----------------------------------
the : O O
statement : O O
came : O O
as : O O
u.n. : B-org B-org
secretary-general: I-org I-org
kofi : B-per B-per
annan : I-per I-per
met : O O
with : O O
officials : O O
in : O O
amman : B-geo B-geo
to : O O
discuss : O O
wednesday : B-tim B-tim
's : O O
attacks : O O
. : O O
3. F1-score란?
우선 아래 표를 복습하자.
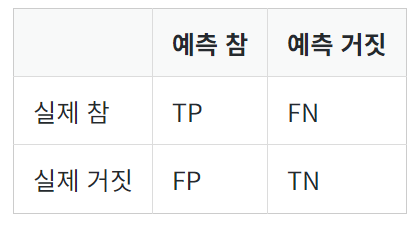

-정밀도(Precision): True라고 예측한 것 중 실제로 True인 비율
-재현률(Recall): 실제 True인 것 중 모델이 True라고 예측한 비율
-f1-score: 정밀도와 재현률로부터 조화평균(harmonic mean)을 구한 것


-구현 코드
pip install seqeval

from seqeval.metrics import classification_report
print(classification_report([labels], [predicted]))
출력 결과 예시1)
MISC, PER 두 개체에서 실제 predicted가 맞춘 것은 하나도 없다.
              precision    recall  f1-score   support

        MISC       0.00      0.00      0.00         2
         PER       0.00      0.00      0.00         3

   micro avg       0.00      0.00      0.00         5
   macro avg       0.00      0.00      0.00         5
weighted avg       0.00      0.00      0.00         5
출력 결과 예시2)
정밀도: True라고 예측한 것이 전부 실제로 True였으므로 1이 나온다.
재현률: MISC에서는 실제 True값 4개 중 2개만 맞춰 0.5, PER에서는 실제 True값 3개 중 2개를 맞춰 0.67이 나왔다.
              precision    recall  f1-score   support

        MISC       1.00      0.50      0.67         2
         PER       1.00      0.67      0.80         3

   micro avg       1.00      0.60      0.75         5
   macro avg       1.00      0.58      0.73         5
weighted avg       1.00      0.60      0.75         5
4. F1-score로 성능 측정하기
위에서 계속 했던 작업과 똑같다. 예측값을 디코딩하고 실제값과 비교하는 그 작업을 함수로 정의할 뿐
from seqeval.metrics import f1_score, classification_report

def sequences_to_tag(sequences):
    result = []
    # 전체 시퀀스로부터 시퀀스를 하나씩 꺼낸다.
    for sequence in sequences:
        word_sequence = []
        # 시퀀스로부터 확률 벡터 또는 원-핫 벡터를 하나씩 꺼낸다.
        for pred in sequence:
            # 정수로 변환. 예를 들어 pred가 [0, 0, 1, 0 ,0]라면 1의 인덱스인 2를 리턴한다.
            pred_index = np.argmax(pred)
            # index_to_ner을 사용하여 정수를 태깅 정보로 변환. 'PAD'는 'O'로 변경.
            word_sequence.append(index_to_ner[pred_index].replace("PAD", "O"))
        result.append(word_sequence)
    return result

y_predicted = model.predict([X_test])
pred_tags = sequences_to_tag(y_predicted)
test_tags = sequences_to_tag(y_test)

print("F1-score: {:.1%}".format(f1_score(test_tags, pred_tags)))
print(classification_report(test_tags, pred_tags))
여기에 CRF 층이라는 것을 추가하면 성능을 더 높일 수 있다.
# 12-06 BiLSTM-CRF를 이용한 개체명인식
BiLSTM-CRF 논문링크
https://arxiv.org/pdf/1508.01991v1.pdf
https://arxiv.org/pdf/1603.01360.pdf
1. CRF(Conditional Random Field)란?
-기존 BiLSTM이 예측한 결과 레이블들을 토대로 '결과레이블들 중에서 가장 그럴듯한 레이블'을 또 한번 찾는 것
-즉, 활성화함수를 지난 결과가 CRF 층의 입력으로 전달되면 레이블 시퀀스 중 가장 높은 점수의 시퀀스를 또 한 번 예측
-기존 BiLSTM은 입력단어에 대한 양방향 문맥을 반영한다면, CRF는 출력레이블에 대한 양방향 문맥을 반영
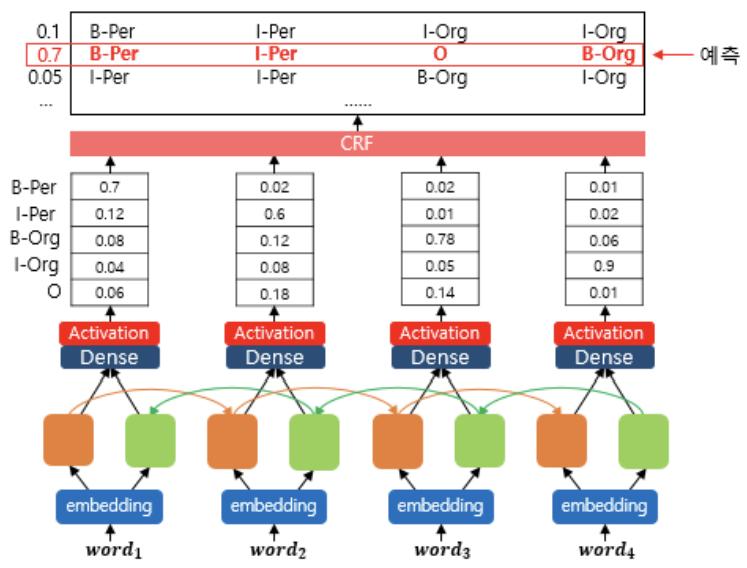
-CRF 층은 훈련을 통해 점차 출력레이블의 규칙을 학습함 (ex. BIO 표현의 제약사항)
- 문장의 첫번째 단어에서는 I가 나오지 않습니다.
- O-I 패턴은 나오지 않습니다.
- B-I-I 패턴에서 개체명은 일관성을 유지합니다. 예를 들어 B-Per 다음에 I-Org는 나오지 않습니다.
2. BiLSTM-CRF를 이용한 개체명인식
깃허브 링크: https://github.com/luozhouyang/keras-crf
pip install keras-crfimport tensorflow as tf
from tensorflow.keras import Model
from tensorflow.keras.layers import Dense, LSTM, Input, Bidirectional, TimeDistributed, Embedding, Dropout
from tensorflow.keras.callbacks import EarlyStopping, ModelCheckpoint
from keras_crf import CRFModel
from seqeval.metrics import f1_score, classification_report
embedding_dim = 128
hidden_units = 64
dropout_ratio = 0.3
sequence_input = Input(shape=(max_len,),dtype=tf.int32, name='sequence_input')
model_embedding = Embedding(input_dim=vocab_size,
output_dim=embedding_dim,
input_length=max_len)(sequence_input)
model_bilstm = Bidirectional(LSTM(units=hidden_units, return_sequences=True))(model_embedding)
model_dropout = TimeDistributed(Dropout(dropout_ratio))(model_bilstm)
model_dense = TimeDistributed(Dense(tag_size, activation='relu'))(model_dropout)
# 최종 출력층이 CRF층으로 분류해야 할 선택지 개수를 의미하는 tag_size를 전달
base = Model(inputs=sequence_input, outputs=model_dense)
model = CRFModel(base, tag_size)
model.compile(optimizer=tf.keras.optimizers.Adam(0.001), metrics='accuracy')
# 조기종료를 사용하기 위한 콜백 정의
# 이 때, keras-crf 모델은 원핫인코딩 레이블을 지원하지 않으므로 y_train이 아닌 y_train_int 사용
es = EarlyStopping(monitor='val_loss', mode='min', verbose=1, patience=4)
mc = ModelCheckpoint('bilstm_crf/cp.ckpt', monitor='val_decode_sequence_accuracy', mode='max', verbose=1, save_best_only=True, save_weights_only=True)
history = model.fit(X_train, y_train_int, batch_size=128, epochs=15, validation_split=0.1, callbacks=[mc, es])
가장 정확도가 높았던 모델을 저장 후 불러와 샘플 데이터에 대해 예측을 수행해본다.
model.load_weights('bilstm_crf/cp.ckpt')

i = 13
y_predicted = model.predict(np.array([X_test[i]]))[0] # 입력한 테스트용 샘플에 대해서 예측 y를 리턴
labels = np.argmax(y_test[i], -1) # 원-핫 인코딩을 다시 정수 인코딩으로 변환

print("{:15}|{:5}|{}".format("단어", "실제값", "예측값"))
print(35 * "-")

for word, tag, pred in zip(X_test[i], labels, y_predicted[0]):
    if word != 0: # PAD값은 제외함.
        print("{:17}: {:7} {}".format(index_to_word[word], index_to_ner[tag], index_to_ner[pred]))
# 결과
단어 |실제값 |예측값
-----------------------------------
the : O O
statement : O O
came : O O
as : O O
u.n. : B-org B-org
secretary-general: I-org I-org
kofi : B-per B-per
annan : I-per I-per
met : O O
with : O O
officials : O O
in : O O
amman : B-geo B-geo
to : O O
discuss : O O
wednesday : B-tim B-tim
's : O O
attacks : O O
. : O O
테스트 데이터에 대해 모델을 평가한다. 이 때, 기존 BiLSTM 실습에서 사용한 코드는 사용하지 못한다.
확률벡터를 입력으로 받았던 sequences_to_tag 대신, 정수시퀀스를 입력으로 받는 sequences_to_tag_for_crf 를 새롭게 정의한다.
def sequences_to_tag_for_crf(sequences):
    result = []
    # 전체 시퀀스로부터 시퀀스를 하나씩 꺼낸다.
    for sequence in sequences:
        word_sequence = []
        # 시퀀스로부터 예측 정수 레이블을 하나씩 꺼낸다.
        for pred_index in sequence:
            # index_to_ner을 사용하여 정수를 태깅 정보로 변환. 'PAD'는 'O'로 변경.
            word_sequence.append(index_to_ner[pred_index].replace("PAD", "O"))
        result.append(word_sequence)
    return result

pred_tags = sequences_to_tag_for_crf(y_predicted)
test_tags = sequences_to_tag(y_test)

print("F1-score: {:.1%}".format(f1_score(test_tags, pred_tags)))
print(classification_report(test_tags, pred_tags))
# 12-07 문자 임베딩 활용하기
개체명인식기의 성능을 올리기 위해 워드임베딩과 문자임베딩을 연결(concatenate)하여 함께 입력으로 사용할 수 있다.
1. 문자 임베딩을 위한 전처리
단어임베딩, 문자임베딩을 앞에서 배웠으므로 구체적인 코드는 생략한다.
2.BiLSTM-CNN을 이용한 개체명인식
import tensorflow as tf
from tensorflow.keras.layers import Embedding, Input, TimeDistributed, Dropout, concatenate, Bidirectional, LSTM, Conv1D, Dense, MaxPooling1D, Flatten
from tensorflow.keras import Model
from tensorflow.keras.initializers import RandomUniform
from tensorflow.keras.callbacks import EarlyStopping, ModelCheckpoint
from tensorflow.keras.models import load_model
from seqeval.metrics import f1_score, classification_report
from keras_crf import CRFModel

embedding_dim = 128
char_embedding_dim = 64 # 정수로 맵핑된 문자가 이 임베딩층을 통과하며 64차원의 벡터가 됨
dropout_ratio = 0.5
hidden_units = 256
num_filters = 30 # 커널의 개수
kernel_size = 3 # 1D 합성곱층의 커널 크기

# 단어 임베딩
word_ids = Input(shape=(None,),dtype='int32', name='words_input')
word_embeddings = Embedding(input_dim=vocab_size, output_dim=embedding_dim)(word_ids)

# char 임베딩
char_ids = Input(shape=(None, max_len_char,), name='char_input')
embed_char_out = TimeDistributed(Embedding(len(char_to_index), char_embedding_dim, embeddings_initializer=RandomUniform(minval=-0.5, maxval=0.5)), name='char_embedding')(char_ids)
dropout = Dropout(dropout_ratio)(embed_char_out)

# char 임베딩에 대해서는 Conv1D 수행-결과로써 하나의 단어에 대한 단어벡터를 얻음
conv1d_out = TimeDistributed(Conv1D(kernel_size=kernel_size, filters=num_filters, padding='same', activation='tanh', strides=1))(dropout)
maxpool_out = TimeDistributed(MaxPooling1D(max_len_char))(conv1d_out)
char_embeddings = TimeDistributed(Flatten())(maxpool_out)
char_embeddings = Dropout(dropout_ratio)(char_embeddings)

# 문자임베딩을 통해 얻은 단어벡터와, 그냥 단어벡터를 연결
output = concatenate([word_embeddings, char_embeddings])

# 연결한 벡터를 가지고 문장의 길이만큼 LSTM을 수행
output = Bidirectional(LSTM(hidden_units, return_sequences=True, dropout=dropout_ratio))(output)

# 출력층
output = TimeDistributed(Dense(tag_size, activation='softmax'))(output)

model = Model(inputs=[word_ids, char_ids], outputs=[output])
model.compile(loss='categorical_crossentropy', optimizer='nadam',  metrics=['acc'])

# 조기종료 정의
es = EarlyStopping(monitor='val_loss', mode='min', verbose=1, patience=4)
mc = ModelCheckpoint('bilstm_cnn.h5', monitor='val_acc', mode='max', verbose=1, save_best_only=True)

history = model.fit([X_train, X_char_train], y_train, batch_size=128, epochs=15, validation_split=0.1, verbose=1, callbacks=[es, mc])

# 가장 정확도 높았던 가중치 불러와 샘플에 대해 예측
model = load_model('bilstm_cnn.h5')

i = 13 # 확인하고 싶은 테스트용 샘플의 인덱스.
# 입력한 테스트용 샘플에 대해서 예측 y를 리턴
y_predicted = model.predict([np.array([X_test[i]]), np.array([X_char_test[i]])])

y_predicted = np.argmax(y_predicted, axis=-1) # 확률 벡터를 정수 인코딩으로 변경.
labels = np.argmax(y_test[i], -1) # 원-핫 인코딩을 정수 인코딩으로 변경.

print("{:15}|{:5}|{}".format("단어", "실제값", "예측값"))
print(35 * "-")

for word, tag, pred in zip(X_test[i], labels, y_predicted[0]):
    if word != 0: # PAD값은 제외함.
        print("{:17}: {:7} {}".format(index_to_word[word], index_to_ner[tag], index_to_ner[pred]))

# 테스트 데이터에 대해 모델 평가
model = load_model('bilstm_cnn.h5')

i = 13 # 확인하고 싶은 테스트용 샘플의 인덱스.
# 입력한 테스트용 샘플에 대해서 예측 y를 리턴
y_predicted = model.predict([np.array([X_test[i]]), np.array([X_char_test[i]])])

y_predicted = np.argmax(y_predicted, axis=-1) # 확률 벡터를 정수 인코딩으로 변경.
labels = np.argmax(y_test[i], -1) # 원-핫 인코딩을 정수 인코딩으로 변경.

print("{:15}|{:5}|{}".format("단어", "실제값", "예측값"))
print(35 * "-")

for word, tag, pred in zip(X_test[i], labels, y_predicted[0]):
    if word != 0: # PAD값은 제외함.
        print("{:17}: {:7} {}".format(index_to_word[word], index_to_ner[tag], index_to_ner[pred]))
F1-score: 79.0%
precision recall f1-score support
art 0.00 0.00 0.00 63
eve 1.00 0.08 0.14 52
geo 0.81 0.86 0.84 7620
gpe 0.95 0.94 0.94 3145
nat 0.00 0.00 0.00 37
org 0.59 0.56 0.57 4033
per 0.73 0.72 0.73 3545
tim 0.87 0.84 0.85 4067
micro avg 0.79 0.79 0.79 22562
macro avg 0.62 0.50 0.51 22562
weighted avg 0.79 0.79 0.79 22562
3. BiLSTM-CNN-CRF
말그대로 BiLSTM에 문자임베딩도 사용하고 CRF 층까지 추가한 모델이다.
embedding_dim = 128
char_embedding_dim = 64
dropout_ratio = 0.5
hidden_units = 256
num_filters = 30
kernel_size = 3

# 단어 임베딩
word_ids = Input(shape=(None,),dtype='int32', name='words_input')
word_embeddings = Embedding(input_dim=vocab_size, output_dim=embedding_dim)(word_ids)

# char 임베딩
char_ids = Input(shape=(None, max_len_char,), name='char_input')
embed_char_out = TimeDistributed(Embedding(len(char_to_index), char_embedding_dim, embeddings_initializer=RandomUniform(minval=-0.5, maxval=0.5)), name='char_embedding')(char_ids)
dropout = Dropout(dropout_ratio)(embed_char_out)

# char 임베딩에 대해서는 Conv1D 수행
conv1d_out = TimeDistributed(Conv1D(kernel_size=kernel_size, filters=num_filters, padding='same',activation='tanh', strides=1))(dropout)
maxpool_out=TimeDistributed(MaxPooling1D(max_len_char))(conv1d_out)
char_embeddings = TimeDistributed(Flatten())(maxpool_out)
char_embeddings = Dropout(dropout_ratio)(char_embeddings)

# char 임베딩을 Conv1D 수행한 뒤에 단어 임베딩과 연결
output = concatenate([word_embeddings, char_embeddings])

# 연결한 벡터를 가지고 문장의 길이만큼 LSTM을 수행
output = Bidirectional(LSTM(hidden_units, return_sequences=True, dropout=dropout_ratio))(output)

# 출력층
output = TimeDistributed(Dense(tag_size, activation='relu'))(output)

base = Model(inputs=[word_ids, char_ids], outputs=[output])
model = CRFModel(base, tag_size)
model.compile(optimizer=tf.keras.optimizers.Adam(0.001), metrics='accuracy')

es = EarlyStopping(monitor='val_loss', mode='min', verbose=1, patience=4)
mc = ModelCheckpoint('bilstm_cnn_crf/cp.ckpt', monitor='val_decode_sequence_accuracy', mode='max', verbose=1, save_best_only=True, save_weights_only=True)

history = model.fit([X_train, X_char_train], y_train_int, batch_size=128, epochs=15, validation_split=0.1, callbacks=[mc, es])

model.load_weights('bilstm_cnn_crf/cp.ckpt')

i = 13 # 확인하고 싶은 테스트용 샘플의 인덱스.
# 입력한 테스트용 샘플에 대해서 예측 y를 리턴
y_predicted = model.predict([np.array([X_test[i]]), np.array([X_char_test[i]])])[0]
labels = np.argmax(y_test[i], -1) # 원-핫 벡터를 정수 인코딩으로 변경.

print("{:15}|{:5}|{}".format("단어", "실제값", "예측값"))
print(35 * "-")

for word, tag, pred in zip(X_test[i], labels, y_predicted[0]):
    if word != 0: # PAD값은 제외함.
        print("{:17}: {:7} {}".format(index_to_word[word], index_to_ner[tag], index_to_ner[pred]))

y_predicted = model.predict([X_test, X_char_test])[0]
pred_tags = sequences_to_tag_for_crf(y_predicted)
test_tags = sequences_to_tag(y_test)

print("F1-score: {:.1%}".format(f1_score(test_tags, pred_tags)))
print(classification_report(test_tags, pred_tags))
F1-score: 81.0%
precision recall f1-score support
art 0.25 0.06 0.10 63
eve 0.61 0.27 0.37 52
geo 0.85 0.84 0.84 7620
gpe 0.94 0.94 0.94 3145
nat 0.33 0.05 0.09 37
org 0.66 0.60 0.63 4033
per 0.76 0.77 0.77 3545
tim 0.89 0.85 0.87 4067
micro avg 0.82 0.80 0.81 22562
macro avg 0.66 0.55 0.58 22562
weighted avg 0.82 0.80 0.81 22562
4. BiLSTM-BiLSTM-CRF
embedding_dim = 128
char_embedding_dim = 64
dropout_ratio = 0.3
hidden_units = 64

# 단어 임베딩
word_ids = Input(batch_shape=(None, None), dtype='int32', name='word_input')
word_embeddings = Embedding(input_dim=vocab_size,
                                        output_dim=embedding_dim,
                                        name='word_embedding')(word_ids)

# char 임베딩
char_ids = Input(batch_shape=(None, None, None), dtype='int32', name='char_input')
char_embeddings = Embedding(input_dim=(len(char_to_index)),
                                        output_dim=char_embedding_dim,
                                        embeddings_initializer=RandomUniform(minval=-0.5, maxval=0.5),
                                        name='char_embedding')(char_ids)

# char 임베딩을 BiLSTM을 통과 시켜 단어 벡터를 얻고 단어 임베딩과 연결
char_embeddings = TimeDistributed(Bidirectional(LSTM(hidden_units)))(char_embeddings)
output = concatenate([word_embeddings, char_embeddings])

# 연결한 벡터를 가지고 문장의 길이만큼 LSTM을 수행
output = Dropout(dropout_ratio)(output)
output = Bidirectional(LSTM(units=hidden_units, return_sequences=True))(output)

# 출력층
output = TimeDistributed(Dense(tag_size, activation='relu'))(output)

base = Model(inputs=[word_ids, char_ids], outputs=[output])
model = CRFModel(base, tag_size)
model.compile(optimizer=tf.keras.optimizers.Adam(0.001), metrics='accuracy')

es = EarlyStopping(monitor='val_loss', mode='min', verbose=1, patience=4)
mc = ModelCheckpoint('bilstm_bilstm_crf/cp.ckpt', monitor='val_decode_sequence_accuracy', mode='max', verbose=1, save_best_only=True, save_weights_only=True)

history = model.fit([X_train, X_char_train], y_train_int, batch_size=128, epochs=15, validation_split=0.1, callbacks=[mc, es])

model.load_weights('bilstm_bilstm_crf/cp.ckpt')

i = 13 # 확인하고 싶은 테스트용 샘플의 인덱스.
# 입력한 테스트용 샘플에 대해서 예측 y를 리턴
y_predicted = model.predict([np.array([X_test[i]]), np.array([X_char_test[i]])])[0]
labels = np.argmax(y_test[i], -1) # 원-핫 벡터를 정수 인코딩으로 변경.

print("{:15}|{:5}|{}".format("단어", "실제값", "예측값"))
print(35 * "-")

for word, tag, pred in zip(X_test[i], labels, y_predicted[0]):
    if word != 0: # PAD값은 제외함.
        print("{:17}: {:7} {}".format(index_to_word[word], index_to_ner[tag], index_to_ner[pred]))

y_predicted = model.predict([X_test, X_char_test])[0]
pred_tags = sequences_to_tag_for_crf(y_predicted)
test_tags = sequences_to_tag(y_test)

print("F1-score: {:.1%}".format(f1_score(test_tags, pred_tags)))
print(classification_report(test_tags, pred_tags))
F1-score: 80.9%
precision recall f1-score support
art 0.29 0.03 0.06 63
eve 1.00 0.04 0.07 52
geo 0.83 0.86 0.85 7620
gpe 0.95 0.94 0.95 3145
nat 0.35 0.16 0.22 37
org 0.67 0.58 0.62 4033
per 0.79 0.74 0.77 3545
tim 0.88 0.84 0.86 4067
micro avg 0.83 0.79 0.81 22562
macro avg 0.72 0.52 0.55 22562
weighted avg 0.82 0.79 0.80 22562'딥러닝 > 딥러닝을 이용한 자연어처리 입문' 카테고리의 다른 글
| [딥러닝 NLP] 14. RNN encoder-decoder (1) | 2024.02.06 |
|---|---|
| [딥러닝 NLP] 13. Subword Tokenizer(BPE, SentencePiece, Huggingface) (0) | 2024.02.01 |
| [딥러닝 NLP] 11. CNN(Convolution Neural Network) (1) | 2024.01.31 |
| [딥러닝 NLP] 10. Text Classification 실습(RNN, LSTM, GRU, Naive Bayes, BiLSTM) (1) | 2024.01.31 |
| [딥러닝 NLP] 09. 워드 임베딩(Word2Vec, SGNS, GloVe, FastText, ELMo, Doc2Vec) (1) | 2024.01.30 |


